← Visit Appcues.com
×
×

How to build a user onboarding funnel with Amplitude
“That which is measured, improves.” — Pearson’s Law
Skip to section:

Skip to section:

“That which is measured, improves.” — Pearson’s Law

Many users sign up for a product, only to never return.

A product’s retention curve typically reflects this with a big dip immediately after sign up. If you’re lucky, the curve might eventually plateau.

user retention

The easiest way to give your entire retention curve a lift is by giving the beginning, that special place where user onboarding happens, a little boost: 

increasing user rentention

A small increase in retention during week 1 lifts your entire curve.

Regardless of what your onboarding looks like today, there is always room to improve the new user experience and create retention ripple effects for the entire user journey.

To help you create a more effective onboarding experience, we’ve put together this step-by-step guide on how to build an onboarding funnel in Amplitude, a powerful web and mobile analytics tool. With Amplitude, you can uncover user behaviors in granular detail and turn that data into actionable insights.

You’ll need the help of a developer to set up Amplitude. We’ve called out the developer-heavy steps in this guide, so you can hand point them to the relevant sections. For these sections, we’ve provided summaries to help developers get started, but developers may want to go through Amplitude’s resources for detailed instructions (links provided).

Whiteboard Your Onboarding Funnel

Define Your Activation Event

Your onboarding funnel should start at sign up and end at your activation event.

Your activation event is the first point where you deliver the value that you promised. The percentage of people who reach the activation event is your activation rate. This is the key metric to track and improve.

Think of your activation event as the goal post in your onboarding funnel; all steps in the onboarding funnel should steer towards it.

If you don’t know your activation event, think about the first time a user truly gets your product. Check out examples from Dropbox and Shopify for inspiration.

Map Out Your Onboarding Journey

Once you have your activation event defined, you’ll have a better sense of the steps that should make up your onboarding journey leading up to activation.

This process can take several hours and attempts. It’s the most difficult—and most important—step in building your onboarding funnel.

Start by listing all the things a new user needs to do with your product in order to reach your activation event. Next, sort them into what you believe is the most obvious chronological order. Funnels tend to denote a chronological path, but the reality is often less linear. 

There might be dozens upon dozens of potential paths a new user could take to activation. That’s OK. Part of the value of using a tool like Amplitude is that you can trace back the success paths of your power users in order to determine what your funnel should look like.

For example, a social networking site’s onboarding funnel might look something like:
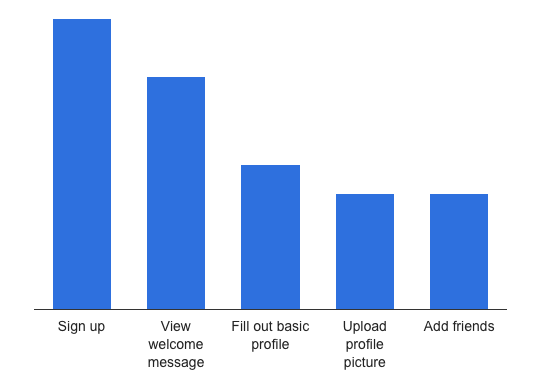
sample onboarding funnel

The onboarding funnel starts when a new user agrees to try out the product, usually through a CTA or a form submission on the landing page. Sign up is the moment when a user moves from the landing page to an in-product welcome page.

The next steps after sign up should help users gain the most immediate value from your product. These steps should prime users to continue towards activation (and to come back when they’re done).

As mentioned, the first point where you deliver the value you promised becomes your activation event, and where your new user onboarding funnel will end. 

Name Your Events

As you identify and order the steps in your onboarding funnel, you’ll want to give them semantic names for tracking and reading purposes. The more descriptive you are about what to track, the clearer your dev team will be on what to attach the event tracking code to when setting up Amplitude, and the clearer it is for other team members to understand your funnels.

Install Amplitude and Set Up the Onboarding Funnel

Install Embed Script

If you haven’t already, sign up for Amplitude to start your trial or create an account. When asked for what kind of SDK you want to install, choose Javascript SDK.

If you use Segment, a platform that collects and sends customer data through to other tools, choose Segment and skip ahead to the next step, assign user IDs.   

For detailed instructions, developers may want to check out Amplitude’s master guide to installation. Below is a quick start summary.  

Amplitude will ask you to install a script on your website. The script will look something like this (with the proper API key in it):  

Amplitude_embed_script.png

You can find your API key at www.amplitude.com/settings

amplitude_api_key.png

Assign User IDs

While assigning user IDs is an optional step in Amplitude, it’s recommended, especially if your product requires a login. A unique ID can be a database ID or email address and helps identify specifically who is completing each stage of the onboarding funnel.

In order to do this, the amplitude.getInstance().init('YOUR_API_KEY_HERE'); line should be modified to be amplitude.getInstance().init('YOUR_API_KEY_HERE', 'USER_ID_HERE'); with the proper API_KEY and USER_ID.

More details for developers here: https://amplitude.zendesk.com/hc/en-us/articles/206404628

Set Up Event Tracking

Product managers should give the names of the events that were defined earlier to the developer.

The developer will then track each event using the following code in your application source code when or wherever the event happens.

amplitude.getInstance().logEvent('EVENT_NAME_HERE');

Order Events into Steps to Create Funnel

Now that your developer has entered the events into Amplitude, you can start to order them into the sequential steps that a new user would take.

Start by clicking the create funnel button, and fill out basic information:  

amplitude funnel steps basics

The same screen offers more advanced options too:

amplitude funnel steps advanced

“Group By” allows you to see how users with a property value convert at a specific step.

“Compute Funnel In” allows you to compute the funnel in the order you specified or in an unordered mode. Comparing the two could help you determine whether or not you need to tweak the order of your steps. 

“Conversion Window” lets you specify the window of time a user has to complete the funnel.

For more information and resources, check out Amplitude’s doc: https://amplitude.zendesk.com/hc/en-us/articles/205390597-Understanding-Funnels

Understand and Optimize Your Onboarding Funnel

Wait for Your Funnel to Populate with Meaningful Data

Amplitude will start collecting data immediately, but it can take a few days, or weeks if you have a smaller user base, before you can derive meaningful insights from your funnel.

Here’s what you might see:

calm onboarding funnel

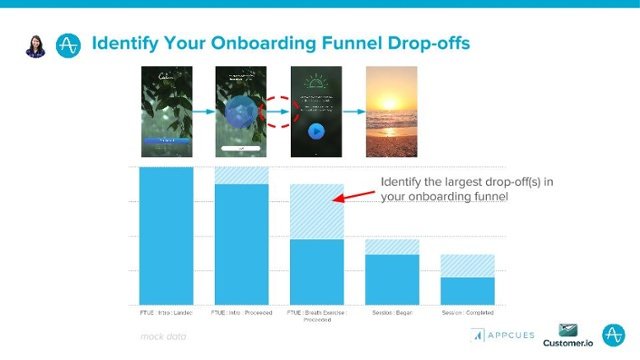
In this mock data from Calm, a meditation app that uses Amplitude to measure user onboarding, the conversion rate between steps 2 and 3 is the lowest—a sign that we should investigate what’s happening here.

Experiment with Cohorts

To find out what is affecting the drop off rates between each step, you can map your steps back to your onboarding flow.

Here’s the Calm example with the onboarding process overlaid: 
Identify Your Onboarding Funnel Drop-offs

Now that you know exactly where your biggest area of improvement is, cohorts can help figure out why. Even if you don’t know where to begin filtering, Amplitude makes it very easy to experiment with segmentation. Try segmenting different user properties, and look for any differences in the conversion rate.

After segmenting by language, Calm unsurfaced a potential language barrier issue. The mock data shows that more non-English don’t complete step 3, lowering the overall drop-off rate. 

onboarding funnel segment language

Platform, device type, device family, country, city, region, start version, version, carrier, OS, language, and library are all automatically tracked. Amplitude’s customers typically implement around 20 additional custom user properties, so you can segment to your heart’s desire.

The beauty of analytics is that it shows you behaviors you’d never expect, so don’t be afraid to play around with different cohorts and dig deeper into your user experience.

Continue Optimizing Further Down the Line

Setting up Amplitude and building a user onboarding funnel are just the first steps to delivering value to your users.

For help acting on the insights you learned from funnel analysis, Appcues offers code-free user onboarding software for building and quickly iterating personalized user experiences.  

While the activation event marks the end of the new user onboarding funnel, onboarding never really ends. There are many opportunities to guide your users through subsequent Aha! moments and deepen their engagement with your product. Both Amplitude and Appcues can help you turn your newest users into power users.

Want to dig deeper? Learn more about using Amplitude across the entire customer journey. 

Guru Mahendran
Activation at Appcues
Skip to section:

Skip to section:

“That which is measured, improves.” — Pearson’s Law

Many users sign up for a product, only to never return.

A product’s retention curve typically reflects this with a big dip immediately after sign up. If you’re lucky, the curve might eventually plateau.

user retention

The easiest way to give your entire retention curve a lift is by giving the beginning, that special place where user onboarding happens, a little boost: 

increasing user rentention

A small increase in retention during week 1 lifts your entire curve.

Regardless of what your onboarding looks like today, there is always room to improve the new user experience and create retention ripple effects for the entire user journey.

To help you create a more effective onboarding experience, we’ve put together this step-by-step guide on how to build an onboarding funnel in Amplitude, a powerful web and mobile analytics tool. With Amplitude, you can uncover user behaviors in granular detail and turn that data into actionable insights.

You’ll need the help of a developer to set up Amplitude. We’ve called out the developer-heavy steps in this guide, so you can hand point them to the relevant sections. For these sections, we’ve provided summaries to help developers get started, but developers may want to go through Amplitude’s resources for detailed instructions (links provided).

Whiteboard Your Onboarding Funnel

Define Your Activation Event

Your onboarding funnel should start at sign up and end at your activation event.

Your activation event is the first point where you deliver the value that you promised. The percentage of people who reach the activation event is your activation rate. This is the key metric to track and improve.

Think of your activation event as the goal post in your onboarding funnel; all steps in the onboarding funnel should steer towards it.

If you don’t know your activation event, think about the first time a user truly gets your product. Check out examples from Dropbox and Shopify for inspiration.

Map Out Your Onboarding Journey

Once you have your activation event defined, you’ll have a better sense of the steps that should make up your onboarding journey leading up to activation.

This process can take several hours and attempts. It’s the most difficult—and most important—step in building your onboarding funnel.

Start by listing all the things a new user needs to do with your product in order to reach your activation event. Next, sort them into what you believe is the most obvious chronological order. Funnels tend to denote a chronological path, but the reality is often less linear. 

There might be dozens upon dozens of potential paths a new user could take to activation. That’s OK. Part of the value of using a tool like Amplitude is that you can trace back the success paths of your power users in order to determine what your funnel should look like.

For example, a social networking site’s onboarding funnel might look something like:

sample onboarding funnel

The onboarding funnel starts when a new user agrees to try out the product, usually through a CTA or a form submission on the landing page. Sign up is the moment when a user moves from the landing page to an in-product welcome page.

The next steps after sign up should help users gain the most immediate value from your product. These steps should prime users to continue towards activation (and to come back when they’re done).

As mentioned, the first point where you deliver the value you promised becomes your activation event, and where your new user onboarding funnel will end. 

Name Your Events

As you identify and order the steps in your onboarding funnel, you’ll want to give them semantic names for tracking and reading purposes. The more descriptive you are about what to track, the clearer your dev team will be on what to attach the event tracking code to when setting up Amplitude, and the clearer it is for other team members to understand your funnels.

Install Amplitude and Set Up the Onboarding Funnel

Install Embed Script

If you haven’t already, sign up for Amplitude to start your trial or create an account. When asked for what kind of SDK you want to install, choose Javascript SDK.

If you use Segment, a platform that collects and sends customer data through to other tools, choose Segment and skip ahead to the next step, assign user IDs.   

For detailed instructions, developers may want to check out Amplitude’s master guide to installation. Below is a quick start summary.  

Amplitude will ask you to install a script on your website. The script will look something like this (with the proper API key in it):  

Amplitude_embed_script.png

You can find your API key at www.amplitude.com/settings

amplitude_api_key.png

Assign User IDs

While assigning user IDs is an optional step in Amplitude, it’s recommended, especially if your product requires a login. A unique ID can be a database ID or email address and helps identify specifically who is completing each stage of the onboarding funnel.

In order to do this, the amplitude.getInstance().init('YOUR_API_KEY_HERE'); line should be modified to be amplitude.getInstance().init('YOUR_API_KEY_HERE', 'USER_ID_HERE'); with the proper API_KEY and USER_ID.

More details for developers here: https://amplitude.zendesk.com/hc/en-us/articles/206404628

Set Up Event Tracking

Product managers should give the names of the events that were defined earlier to the developer.

The developer will then track each event using the following code in your application source code when or wherever the event happens.

amplitude.getInstance().logEvent('EVENT_NAME_HERE');

Order Events into Steps to Create Funnel

Now that your developer has entered the events into Amplitude, you can start to order them into the sequential steps that a new user would take.

Start by clicking the create funnel button, and fill out basic information:  

amplitude funnel steps basics

The same screen offers more advanced options too:

amplitude funnel steps advanced

“Group By” allows you to see how users with a property value convert at a specific step.

“Compute Funnel In” allows you to compute the funnel in the order you specified or in an unordered mode. Comparing the two could help you determine whether or not you need to tweak the order of your steps. 

“Conversion Window” lets you specify the window of time a user has to complete the funnel.

For more information and resources, check out Amplitude’s doc: https://amplitude.zendesk.com/hc/en-us/articles/205390597-Understanding-Funnels

Understand and Optimize Your Onboarding Funnel

Wait for Your Funnel to Populate with Meaningful Data

Amplitude will start collecting data immediately, but it can take a few days, or weeks if you have a smaller user base, before you can derive meaningful insights from your funnel.

Here’s what you might see:

calm onboarding funnel

In this mock data from Calm, a meditation app that uses Amplitude to measure user onboarding, the conversion rate between steps 2 and 3 is the lowest—a sign that we should investigate what’s happening here.

Experiment with Cohorts

To find out what is affecting the drop off rates between each step, you can map your steps back to your onboarding flow.

Here’s the Calm example with the onboarding process overlaid: 

Identify Your Onboarding Funnel Drop-offs

Now that you know exactly where your biggest area of improvement is, cohorts can help figure out why. Even if you don’t know where to begin filtering, Amplitude makes it very easy to experiment with segmentation. Try segmenting different user properties, and look for any differences in the conversion rate.

After segmenting by language, Calm unsurfaced a potential language barrier issue. The mock data shows that more non-English don’t complete step 3, lowering the overall drop-off rate. 

onboarding funnel segment language

Platform, device type, device family, country, city, region, start version, version, carrier, OS, language, and library are all automatically tracked. Amplitude’s customers typically implement around 20 additional custom user properties, so you can segment to your heart’s desire.

The beauty of analytics is that it shows you behaviors you’d never expect, so don’t be afraid to play around with different cohorts and dig deeper into your user experience.

Continue Optimizing Further Down the Line

Setting up Amplitude and building a user onboarding funnel are just the first steps to delivering value to your users.

For help acting on the insights you learned from funnel analysis, Appcues offers code-free user onboarding software for building and quickly iterating personalized user experiences.  

While the activation event marks the end of the new user onboarding funnel, onboarding never really ends. There are many opportunities to guide your users through subsequent Aha! moments and deepen their engagement with your product. Both Amplitude and Appcues can help you turn your newest users into power users.

Want to dig deeper? Learn more about using Amplitude across the entire customer journey. 

Guru Mahendran
Activation at Appcues
You might also like...