


Flow building
Apply knowledge from the overview and experience type lessons to build a real Flow.


You made it to the Flow building guide!

This training is designed to help you learn the basics of building Flows:
- How to organize and keep track of Flows
- Best practices for building Flows
- How to build branching Flows and use buttons
After this course, you should feel comfortable building a few experiences for your product.
What do you need to build a Flow?
- The Appcues Builder 🛠
- An inquisitive, creative mind 🤓
Where to begin building a Flow... What do you want users to achieve or what are you asking from them?
Think of your Flows as targeting groups of people throughout their lifecycles.
Focus on the folks who need the most help first (usually this is new users/onboarding)

Pattern review
Keep it short and sweet! Try to keep tours under 5-7 steps and mix up pattern types when you can to keep engagement. Don’t just point at buttons, people can see the buttons, tell them what value is behind the buttons.
As a reminder:
- Interruptive: users don't control when they see content, their usage is interrupted with an announcement
- Inline: users don't control when content appears, but additional action is required for the whole experience to display and it doesn't interrupt their work
- Embedded: users choose when they want to interact with content that is persistent and does not interrupt their work
Appcues pattern types:
- Modal: Interruptive pattern that takes up the full screen. Onboarding, big feature announcements, outages, or crucial promotions. Use with care!
- Slideout: Interruptive pattern that “slides” into (and then back out of) your product from any direction you choose. Surveys, webinar invites, feature promotions. Use with care!
- Tooltip: Inline pattern, tour bubble tips that point at elements. Product tours, upsells, feature announcements. Don't make product tours longer than a few steps. Use spotlights and interruptive tooltips with care.
- Hotspot: Inline pattern, a customizable flashing orb that highlights an element with a tooltip. Product tours, upsells, feature adoption. Add buttons or launches other tours.
- Checklist: Embedded pattern, a list of tasks for users to complete that launch Flows or link to URLs. Use for onboarding, new features. Stays in bottom right or bottom left.
- Launchpad: Embedded pattern, a list of Flows users can relaunch from a widget in your product (see “Help” in Appcues).
- Pins: A persistent experience that lives on a page of your product. They’re designed to provide on-demand help and content to your users. They can display as icons with tooltips or a button. Surveys, onboarding, feature adoption, upsell, feature announcements, support ticket reduction.
- Banners: A persistent experience that is a real-estate-friendly and well-known UI pattern that attach to the top of the user’s screen.Communicate announcements, maintenance messages, account notices and more.
Ready to get started? Open the Appcues Builder over an area of your product where you'd like to build a Flow, i.e., the login page or inviting a user.
Pick a starting pattern
The moment you've been waiting for! We're going to walk through building an example Flow to show you all the ins and outs of Builder.
Let's get started!
- Head to https://studio.appcues.com/ using Chrome
- Click "Flows" in the left-hand navigation
- Click Create a Flow and pick a name (any name is good for now, we'll give advice on naming conventions a bit later in this guide)
- Skip adding a tag for now, more advice on that later as well
- Direct the Builder to open on a specific url for your product, like "https://app.coolproduct.com/welcome"
- Click the Appcues Builder Chrome Extension to open the Appcues Builder over that URL
- Add a step and select the "Personalized" modal
Next up, customize the content in the template and set button actions 😎
You should now have the "Personalized Welcome" modal template with three buttons open over the URL you selected. From here, we're going to customize the text and personalize the actions for each button.
Select any of the text to edit and customize. Explore your options on the minibar to add emoji, links, personalization tokens, and adjust margins/padding.

In this example, we're using the three buttons to direct users to different paths. Be welcoming, but also ask how we can help them.
- Welcome to the product! How can we help you get started?
- Welcome to the product! You've joined thousands of other folks on our mission to make better software. How can we help you get started?
Can you personalize text with {{first_name}} or any other similar tokens? Yes! Use user properties you're pulling in to make Flows even more welcoming: https://docs.appcues.com/article/162-flow-personalization. Keep in-app text short, to the point, and clear! In an onboarding example, give them a warm welcome and help them find their way with as little text as possible.
After you've customized your text, decide which actions or areas of your product you want to direct your users. In our example, we'll offer folks a few different ways of seeking support.
One button will launch a help doc, one will bring them directly to another area of our product, and one will launch a tour. What actions can you do with buttons?
- Go to URL
- Trigger Flow
- Dismiss Flow
- Go to custom step
- Skip to next group
- Go to next step
Looking for some use cases for branching onboarding?
- Asking onboarding preferences (calls, emails, guidebooks, video)
- Asking user role
- Directing to specific areas of your product
- Kicking off tours by user goal or job to be done
Last up in this quick Flow building recipe, let's add a few steps to make this a full-fledged "product tour."
.jpg)
Let's take a deeper dive into our button actions in this example. Not only can we have this button advance the user to the next step, we can record this action as an event and or/update a user property for further segmentation, triggering, and automation.
Tip: Don't create a “tunnel” in onboarding!A common use case for a welcome Modal is a two-CTA modal that invites the new user to take the tour or close out the Modal and explore on their own.
This allows people to actively opt-out of onboarding to help you measure the success of those who actually do take the tour, and doesn’t force people into a funnel.
We don’t recommend removing the option to completely opt out of a Flow for a few reasons:
- People get frustrated when they are forced into something and will often just pick the first choice they see
- People will rage-click through onboarding, not retaining any of the information, just to finish
- The frustration will put them in a “mood” and already be on a low psych level with your product
Now we'll add our next step to this tour. We can pick any of our patterns here, if the pattern we select is the same type, it'll add it to a current group. If you add any other new type of pattern, it will create a new group. Learn more about step groups in our helpful article.

Let's select a tooltip group to create a tooltip that will start once anyone selected the "Marketers" button. Keep tours short and sweet! Put yourself in your users' shoes and consider cutting down as many steps as possible.
Repeat these steps to build customized experiences for all your user types across the journey. Try different combinations of patterns, test colors, messaging, and placement to maximize engagement.
You’ll get to know the pattern types pretty quickly, and get a feel for what works best in your product by trying different combinations and scenarios. Don’t be afraid to experiment and pivot if you’re not seeing the results you want—the great thing about experiences is that they are quick to build and change.
Settings and triggering
Now that we have a Flow to experiment with, let's stay with the example of using this as an onboarding Flow showing to users once, the first time they sign into your product.
.jpg)
By default, Appcues flows are set to show the first time a user reaches a page. Change these options to make the flow show more frequently, when a specific event takes place*, or only manually, i.e., from a Pin, Launchpad, Checklist, or using a link.
*(Event Triggering is included with Enterprise plans and be purchased as an add-on for Growth plans)
Can you link someone to an Appcues flow? Yep! Just follow the instructions here: https://docs.appcues.com/article/735-permalinks
Page targeting determines which parts of your product (or products) your flows show up on. 🤘 Good page targeting means:
- Not interrupting users
- Pointing to features on pages that actually have them (no buttons to nowhere!)
Page targeting can be dynamic, conditional, or match regex. Exclude high value or “working” pages (unless a Flow has critical information). In Appcues, for example, we exclude most Flows from the subscription pages (unless they are for that page), editing pages for Checklist and Themes, and Flow settings pages.
Should you target an "outage warning" to all pages? In most cases yes, outage warnings are critical messages required to be seen on all pages.
Audience is arguably the most important component to your Flow other than the content. Who sees your Flow can have just as much impact as what your Flow says, so make sure your events and properties are backing up your data engine.
How is an audience different from a segment? A segment is part of your audience. We'll deep dive into segments later in this course.
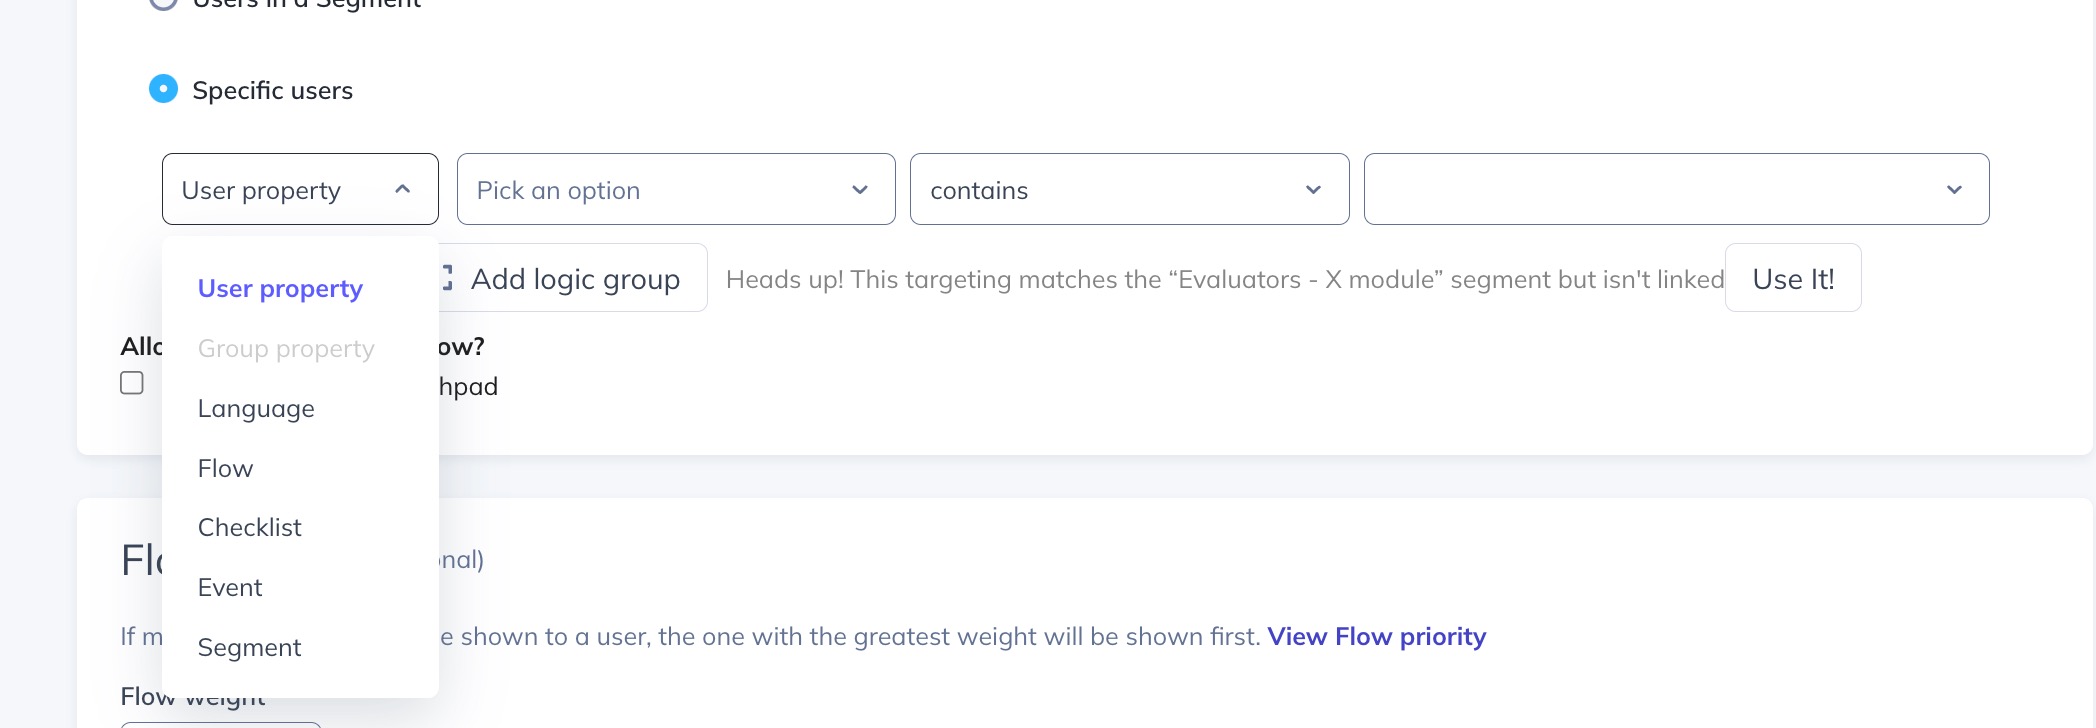
In our example, we selected Users in a Segment and selected a previously created segment from the dropdown.
You can also select specific users in a Flow audience without creating a segment. Target Flows based on a variety of information like user properties, account properties, language, Flows they've completed or skipped, Checklists, Events, or other segments. Need inspiration for targeting?
Goals
Last but not least in our Flows settings page, we can set up our Goal for this Flow. Every Appcues experience has a basic framework:
- Build
- Measure
- Learn
- Repeat
Just like creating segments for your Flows, Goals are created by using a combination of criteria that says "This user has the desired outcome from this Flow." In this screenshot, we can see all the previously created Goals in this account and select them to associate with this Flow.
.jpg)
Why add Goals? The amount of people clicking and engaging with your Flow in only one part of the puzzle. Understanding the impact on product usage completes the picture and you do that through creating Goals.
Basic recipe for high-performing Flows:
- Build the most simple Flow you can using all the knowledge you have (customer conversations, tickets, etc)
- Target that Flow to the most impactful pages
- Only show the Flow to the most interested people, at the right time
- Assign a Goal to understand how effective the Flow was a driving your desired outcome
- Make small changes to your Flow based on feedback and observations
- Continue to iterate and monitor changes in user behavior
You've completed Flow building training. You should have what you need to start playing around building experiences. Don’t be afraid to use your own account to test and build, if you want to clean it up after you can always hit "archive."
